

How To Set Up A Pantograph
Learn how to utilise a pantograph for reproducing an enlarged or reduced copy of your reference material.
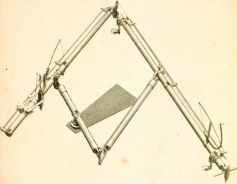
The first pantograph was synthetic in 1603 by the High german astronomer Christoph Scheinerand who used it to copy a figure on an enlarged or reduced calibration. He wrote nearly his invention over 27 years later (1631), in "Pantographice". The tool is yet being used today past some artists and architects to Create an outline.
It'due south based on parallelograms so that when moving 1 specified point, called the tracing stylus, along the outline of an image, an enlarged or reduced version of the image is created past the motility of another signal, called the drawing stylus, which has a lead affixed to information technology.Make sense? Don't worry if it doesn't, all you have to know is what it does.
They come up fabricated out of a couple of materials. metal and forest.
Here is a video on how to utilize a pantograph
Learning how to use a pantograph might be a challenge at first.

At that place may be a fleck of a learning-curve for you before you go comfy with using information technology. You lot'll need to spend some quality time with this tool before producing satisfying results.
I found that because the wood was so lite-weight that I had to add a "sinker" (a lead weight used when fishing) to the part that held the pencil in order to hold it downward. As you tin can see from the photo above, I still tin can't create a perfect, squiggle-gratuitous outline, which makes it necessary to practice a little clean-upward on the lines.
Yous might want to try your hand at making a pantograph out of aluminum. Information technology might be less probable to motion around on you due to the weight of the metallic. Here's a good link to some instructions for edifice one: How to Build a Pantograph
You may not want to use it on original photos.

The reason for this is that the "stylus" that is used to trace over the original image is sometimes pretty sharp. This may not be truthful for all models, but mine had to be filed downwards so that I wouldn't shred my photos into confetti.
1 option would exist to make a copy of the reference photo and use it instead.
I would advise to you that you file-down the tip of a abrupt tracing-stylus. Something else that I am going to try is using a sheet of plastic over the reference photo (with the filed-down tracing-stylus). I'1000 hoping that this volition help to protect the reference photo, while making the tracing-stylus glide over it more than smoothly.
You'll need a large space to apply the pantograph.
To use this tool y'all demand a large plenty space to be able to lay your reference photo and drawing paper side-by-side. How shut together they'll be volition depend on whether your enlarging or reducing the image.
A drafting table would give y'all the space needed. A kitchen table would work as long every bit the clamp fits over the edge of the table. Which brings us to the next consideration...
Where, and how, to secure your pantograph down?

I haven't seen every model that'south made, so I volition tell yous what I know from the research I've done.
Every unit that I take looked at requires a way of securing the device downwards. Some use a clamp, while others demand to be pinned or screwed down.The clench on mine is near ane and six-sixteenth inches broad fully opened. I'd say that if your table is thicker than ane and i-quarter inches thick you might try and notice another tabular array.
Setup
You are now gear up to set-up your pantograph.
When I first looked at the clench, my concern was that it might damage my tabular array (I'm kinda funny that style), and so I chose to place something between it and the table. I tried a piece of cloth first, but the device tended to move on me...
plan B
I found some stuff that I utilize to line my cabinets with. It has a safety-like experience to it, and was perfect for the job. Check-out the video to see exactly what I'm talking about. Y'all tin can, of grade, experiment with dissimilar materials to find one that does the job for yous. If you're non worried nigh the possible damage, merely utilize the clamp "every bit-is". The clench volition work best when put on the left side of the tabular array. Subsequently tightly securing the clamp, place your reference photo (or copy thereof ) nether the tracing-stylus, and a sheet of drawing paper nether the lead-holder stylus. Don't tape them downwardly even so, as you'll demand to move them around to get them into the correct positions.

At present, place the tracing stylus on a spot on the left part of the reference photo while holding the lead-holder up off of the drawing paper (we don't want to make any marks still). At present carefully lay them both down. Is the lead-holder on the same spot on the cartoon paper in relation to the location of the tracing point on the reference photo? If non, and so move the drawing paper/reference photograph around until they are.
Practise the same thing for the correct side of the reference photograph and paper (see the photo above). Once y'all are satisfied that the lead holder and tracing stylus comprehend the areas that you need them to, you can now tape the reference and drawing paper down with your record of choice.
How to Use a Pantograph

Take-agree of both the tracing-stylus, and the lead-holder, and move the tracing-stylus to a indicate on your reference photo that yous want to begin.
With every bit steady a hand as yous can manage, motility the tracing-stylus forth the outline while watching to make sure the atomic number 82 is making a mark on the drawing paper. You may need to add together some sort of weight to the lead-holder in gild to get a mark that you lot can see. A lead fishing "sinker" will work. Y'all tin, of course, apply anything that is heavy enough to practise the job. If it helps, you tin hold and motion both holders at the same time, or merely hold and move the atomic number 82-holder, while watching where the tracing-stylus is going. Make certain you trace every part of the reference photo that you're going to demand in order to finish your cartoon...including the outline of the shadows. After completing the outline, you volition probably demand to clean-upwards the results by straightening-out the lines. Now your ready to draw-in the details. As y'all tin meet in the photo below, you can go pretty decent results. I need to warn you that considering of the nature of the pantograph, getting a satisfying likeness of a face might exist more of a challenge.You lot might start-out by drawing annihilation simply people. If y'all practise decide to attempt people, don't be surprised if the likeness appears off in some mode.

Now you lot know how to use a pantograph!
Play with your new drawing tool to become familiar with it.
Let me know how information technology works for you. Send me some examples of the works you complete after using it. As always, contact me if you have any comments or questions.
Subscribe to my Newsletter
Source: https://www.easy-drawing-lessons.com/pantograph.html
0 Response to "How To Set Up A Pantograph"
Post a Comment